How to Use a Dual-Action Polisher: Beginner's Step-by-Step Guide
A dual-action (DA) polisher is the single most forgiving power tool in detailing, which is exactly why it's the right first machine for anyone who wants to remove swirls, restore gloss, and prep paint for a coating. The "dual action" means the pad both spins and oscillates on an offset spindle, so it doesn't dwell heat in one spot the way a rotary does. Translation: it's very hard to burn through paint if you follow a few simple rules. This guide walks you through how to use a dual action polisher for beginners from a bare, decontaminated panel all the way to a swirl-free, inspection-ready finish.
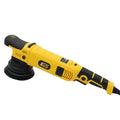
We'll use the Golden State DA Polisher (15mm throw, 1000W, 5-inch backing plate) as the demo machine because the 15mm short throw is the most controllable option for a first-timer, and 1000W is plenty to cut with. We'll pair it with Golden State Pads, Golden State 4-1 Fast Cutting Compound, and Golden State High Gloss Glaze Compound. You can see the full range on our DA polishers collection.
What You'll Need Before You Start
Machine polishing rewards preparation. Rushing the wash-and-decon stage is the number-one beginner mistake, because you'll grind whatever contamination is on the paint straight into it. Gather the following before you plug anything in:
- The polisher: Golden State DA Polisher, 15mm throw, 1000W, 5-inch backing plate.
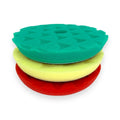
- Pads: Golden State Pads — a cutting pad and a finishing/polishing pad in the 5-inch size to match the plate. Grab 3-inch pads too if you plan to do mirrors, pillars, and tight spots.
- Compound: Golden State 4-1 Fast Cutting Compound for defect removal.
- Finishing polish/glaze: Golden State High Gloss Glaze Compound (16 oz) to refine and maximize gloss.
- Prep: car wash soap, clay/decon, painter's tape, an isopropyl alcohol (IPA) wipe-down solution, and clean microfiber towels.
- Light: a handheld inspection/swirl light. You cannot judge correction under a garage ceiling light alone.
Step 1: Wash and Decontaminate the Paint
Start with a proper two-bucket wash using a quality car wash soap to lift loose grime. Once dry, run your hand (inside a plastic bag to amplify feel) across the panel. If it feels gritty, the paint still has bonded contamination — iron particles, overspray, tar — that needs to come off with a clay bar or clay mitt before you polish. Skipping decon means those particles get dragged under your pad and can inflict fresh scratches. Finish the panel bare and dry. No wax, no sealant, no quick detailer left on the surface.
Step 2: Tape Off Trim, Edges, and Seams
Use painter's tape to protect anything you don't want to hit with an abrasive pad: rubber trim, plastic cladding, badges, headlight/taillight edges, and body-line seams. Two reasons this matters. First, compound stains textured plastic and is a pain to dig out. Second — and more important for a beginner — taping the highest edges and body lines protects the thinnest paint on the car. Paint is always thinnest on a raised edge, so that's where you're most likely to strike through to primer. Tape gives you a visual "do not linger here" boundary.
Step 3: Mount and Prime Your Pad
Center a Golden State cutting pad on the 5-inch backing plate — an off-center pad wobbles, throws vibration into your hands, and polishes unevenly. Now prime the pad. A fresh, dry foam pad soaks up product unevenly, so you condition it first:
- Apply a small amount of Golden State 4-1 Fast Cutting Compound and spread it across the pad face with your finger so the whole surface is lightly coated.
- For the working pass, add 3 to 4 pea-sized dots of compound to the pad. That's it. Beginners almost always use too much product, which causes sling, dust, and a hazy finish.
Less product, worked longer, cuts better than a heavy blob worked briefly. When in doubt, use less.
Step 4: Understand the Speed Settings
The Golden State DA has a variable speed dial. You don't need to memorize RPM numbers — think in terms of jobs:
| Speed setting | What it's for | Pad + product |
|---|---|---|
| 1–2 (low) | Spreading product across the panel before you cut | Any pad, product just dabbed on |
| 4–5 (medium-high) | The cutting pass — removing swirls and defects | Cutting pad + 4-1 Fast Cutting Compound |
| 3–4 (medium) | The finishing/refining pass for max gloss | Finishing pad + High Gloss Glaze |
| 1 (low) | Wiping the pad out / final buff of a spot | n/a |
The 15mm short throw of the Golden State gives you extra control at these speeds — it's less likely to hop or walk on curved panels than a long-throw machine, which is exactly why it's the beginner-friendly pick.
Step 5: Do a Test Spot First
Never polish a whole car on assumptions. Pick a roughly 2x2 ft area on a flat, forgiving panel (a door or a hood section — not a sharp edge). Run one full correction pass with your cutting pad and compound, wipe it clean, and inspect under your swirl light. Did it remove the defects? If yes, that pad-and-compound-and-speed combination is your recipe for the whole car. If not, work the spot a second time or step up your pressure slightly. This one test spot saves you from re-doing an entire vehicle.
Step 6: The Section Technique — Keep the Pad Flat
Work in sections of about 2x2 ft. Larger than that and the product flashes before you finish. The core mechanics:
- Set the pad down before you pull the trigger. Place the machine flat on the panel, then start it. Starting it in the air flings product everywhere.
- Spread first. At speed 1–2, smear your dots of product across the whole section so you're not dry-buffing.
- Then cut. Bump to speed 4–5 and begin your passes.
- Keep the pad flat. This is the golden rule. The entire pad face should stay parallel to the paint. Tilting the machine puts all the pressure on one edge, generates heat, and is the fastest way to burn paint. Flat pad, always.
Step 7: Arm Speed, Overlap, and Pressure
How you move the machine matters as much as the machine itself:
- Arm speed: Move slowly — roughly 1 inch per second. Beginners rush and the abrasives never get the dwell time they need to break down and cut. Slow, deliberate passes.
- Overlap: Use a crosshatch pattern. Do a set of passes left-to-right overlapping each by 50%, then a set of passes top-to-bottom, also overlapping 50%. This guarantees full, even coverage with no missed strips.
- Pressure: Apply moderate, even downward pressure during the cutting pass — think 15–20 lbs, enough to keep the pad engaged and rotating without stalling it. Watch the pad: if it stops spinning, you're pushing too hard or holding it at an angle. Ease off. For the finishing pass, use light pressure — let the polish and machine do the work.
- Passes: Two to four crosshatch passes per section is typical for the cutting stage. Work until the compound goes mostly clear/translucent, which signals the abrasives have broken down.
Step 8: Wipe the Residue and Move On
After the cutting pass, turn the machine off, remove it from the panel, and buff the section with a clean, plush microfiber towel to remove compound residue. Flip to a fresh side of the towel as it loads up. Then move to the adjacent section, overlapping slightly into the area you just finished so you don't leave an untouched seam between sections.
Step 9: Refine With the High Gloss Glaze
Compounding removes defects but can leave very fine haze or micro-marring, especially on soft paint. Swap to a Golden State finishing pad, load 3–4 dots of Golden State High Gloss Glaze Compound, drop your speed to 3–4, and run the same crosshatch technique with lighter pressure. This refining pass polishes out any haze and pulls maximum gloss and clarity from the paint. On harder clear coats you may find the 4-1 compound already finishes down clean — your test spot in Step 5 tells you whether the glaze step is needed.
Step 10: The IPA Wipe-Down
This is the step beginners skip and later regret. Polishing oils fill in fine scratches temporarily and make the paint look better than it truly is. Wipe the panel down with an isopropyl alcohol (IPA) solution to strip all the oils and reveal the true corrected finish. Only after the IPA wipe can you honestly judge whether swirls are gone. This is also mandatory prep if your next step is a ceramic coating — coatings won't bond to an oily surface. See our ceramic coatings comparison if that's your endgame.
Step 11: Inspect Under Proper Light
With the panel oil-free, sweep your inspection light across it from multiple angles. You're hunting for leftover swirls, DA "haze" (a fine cloudy pattern from the machine), and any deeper scratches you couldn't fully remove. If a section still shows defects, re-cut just that spot. When it's clean under the light, that panel is done — protect it with a wax, sealant, or coating so all that work lasts.
Common Beginner Mistakes to Avoid
- Too much product. More compound means more sling and dust, not more cut. Stick to 3–4 dots.
- Tilting the pad. The single biggest cause of burnt paint. Keep it flat.
- Moving too fast. Slow arm speed lets the abrasives actually work.
- Working in the sun / on hot paint. Product flashes, correction fails, streaking follows.
- Skipping the test spot and IPA wipe. You end up guessing at results and re-doing panels.
- Lingering on edges. Thin paint plus dwell time equals strike-through. Tape and stay off them.
Why the Golden State DA Is the Right First Machine
The Golden State DA Polisher (15mm throw, 1000W, 5-inch plate) hits the sweet spot for learners: the short 15mm throw is easy to control on panels and edges, while 1000W gives you real cutting power so you're not fighting the machine to remove defects. Pair it with Golden State Pads (5-inch for panels, 3-inch for tight spots), Golden State 4-1 Fast Cutting Compound for correction, and Golden State High Gloss Glaze Compound to finish — that's a complete, matched system at a value price because we took the line on consignment and are passing the savings along.
If you're shopping around, we also stock the Max Shine M8S V2, the brushless MB8/MB15/MB21 machines, and premium Rupes dual-action options (LHR15/LHR21, Nano iBrid, HLR75) — note the Rupes LH19 we also stock is a rotary, not a DA, and is not a beginner machine — but for a first machine that punches well above its price, the Golden State is the honest value hero. Compare the whole range in our DA polishers collection.
Related Reading in This Series
- Car Detailing for Beginners: The Complete Starter Guide — where machine polishing fits in the bigger routine.
- Best Dual-Action Polisher for Beginners (2026) — if you haven't bought yet.
- How to Remove Swirl Marks From Car Paint — a deeper dive on the most common defect.
- Golden State DA Polisher: 15mm vs 21mm — Which Throw? — choosing between our two machines.
- Best Cutting Compound and Polish for Paint Correction — dialing in the right abrasive.
Ready to Start Polishing?
Grab the complete beginner system and get correcting this weekend: the Golden State DA Polisher (15mm, 1000W, 5-inch plate), a set of Golden State Pads, Golden State 4-1 Fast Cutting Compound, and Golden State High Gloss Glaze. Not sure it's the right throw for your vehicle? Browse the full DA polishers collection or stop by our Kissimmee shop and we'll walk you through it in person.
Frequently Asked Questions
Can a beginner really use a dual-action polisher without damaging the paint?
Yes. A DA polisher oscillates as well as spins, so it doesn't build heat in one spot the way a rotary does, which makes it very hard to burn through paint. As long as you keep the pad flat, work in the shade on cool paint, avoid lingering on raised edges, and do a test spot first, a first-timer can safely correct paint. The Golden State 15mm short-throw machine is especially forgiving for learners.
How much compound should I put on the pad?
Only 3 to 4 pea-sized dots per section, after priming the pad with a thin initial layer. Beginners almost always overload the pad, which causes product sling, dust, and a hazy finish. Less product worked slowly cuts better than a big blob worked quickly.
What speed should I set the polisher to?
Use speed 1–2 to spread the product first, then 4–5 for the cutting pass with the Golden State 4-1 Fast Cutting Compound, and drop to 3–4 for the finishing pass with the High Gloss Glaze. Move your arm slowly (about 1 inch per second) and overlap each pass by 50% in a crosshatch pattern.
Why do I need an IPA wipe-down after polishing?
Polishing oils temporarily fill in fine scratches and can make the finish look more corrected than it actually is. Wiping the panel with an isopropyl alcohol solution strips those oils so you can judge the true result under an inspection light. It's also required before applying a ceramic coating, since coatings won't bond to an oily surface.
Do I need both a cutting pad and a finishing pad?
For most swirl removal, yes. The cutting pad plus the 4-1 Fast Cutting Compound removes the defects, and the finishing pad plus High Gloss Glaze refines out any haze for maximum gloss. On harder clear coats the compound may finish clean on its own — your test spot tells you whether the finishing step is needed. Golden State Pads come in 5-inch for panels and 3-inch for tight areas.
Is the 15mm Golden State the right pick, or should I get the 21mm?
For a beginner, the 15mm short-throw Golden State is the more controllable choice — it's easier to manage on curved panels and edges. The 21mm long-throw model covers big flat panels faster and suits larger vehicles or more experienced users. Our '15mm vs 21mm' guide breaks down the tradeoff in detail.
Ready to Correct Paint This Weekend?
Grab the complete beginner system — polisher, pads, compound, and glaze — matched and priced to move.
Shop DA Polishers →